Safety Notice: When creating any DIY items that are intended to be used around or by an infant or child, please do your due diligence and research child safety requirements (choking hazards, poisoning, etc.) to make sure that your projects and all components are safe to use. Our projects are intended for inspiration only.
Project Intro
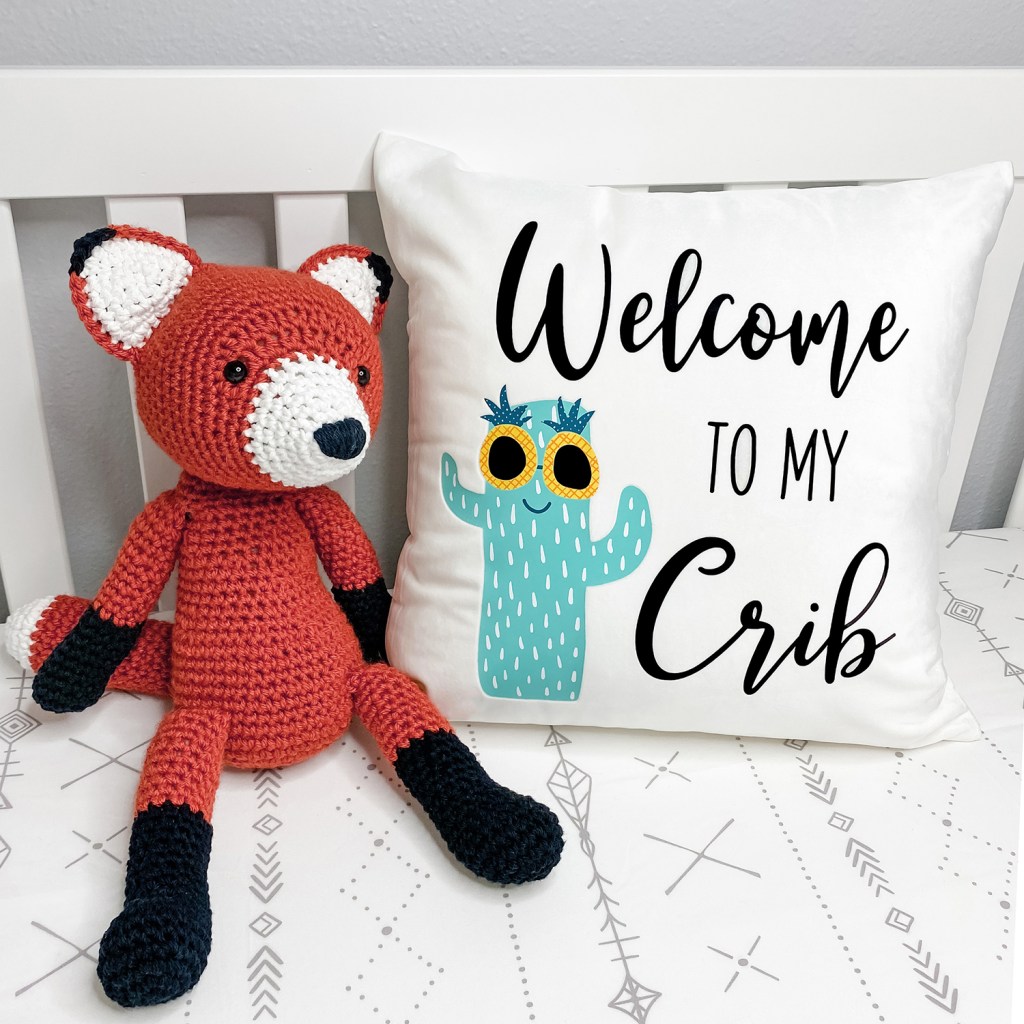
As I work to build my boho “Little Man Cave” nursery, I’ve been creating items with cute desert themes, such as cacti and foxes. For this project, I thought that using the phrase “Welcome to My Crib” in a nursery was a really cute spin on the popular term! To make it my own, I added a fun, cactus graphic with pineapple sunglasses to make the design cute and baby-friendly. In my nursery, I paired my pillow with a boho tribal crib sheet and an adorable crochet fox by Caroline’s Sweet Crafts!
Materials
- 1 Pillow Cover – I used a soft, velvet 16″ x 16″ pillow cover
- 1 Pillow Insert – I always recommend using an insert that is the same size as the pillow cover for max fill
- Cricut machine
- Heat Press
- Scissors, weeding tool
- Assorted colors of Heat Transfer Vinyl
- Siser HTV in White
- Siser HTV in Aqua
- Siser HTV in Sun Yellow
- Siser HTV in Turquoise Blue
- Cricut Iron-On Vinyl in Yellow
- Siser HTV in Black

Directions
- First, I chose a cactus design that I liked and uploaded it into my Cricut Design Space software. I added the text I wanted and arranged everything in a square design to best fit my pillow. For my 16″ x 16″ pillow cover, I scaled the graphic down to 11″ x 11″ so that the image would be centered on the flat part of the pillow.
- Next, I cut out the different layers. I sliced each element by color to cut the shapes.
REMINDER: Make sure to mirror your images when cutting on iron-on materials! - With the listed materials, the recommended heat press setting was 305°F for 15 seconds. **However, since I was layering and pressing the vinyl multiple times, I reduced the press time by 5 seconds to minimize shrinking. I ironed the shapes on in layers, starting with the black text and aqua cactus shape. I built up the other layers from the bottom up (white cactus thorns > turquoise pineapple crown and mouth > yellow pineapple > sun yellow pineapple scale pattern > black sunglasses).
IMPORTANT: Make sure to cover all the exposed vinyl with a cloth when ironing the different layers so that the heat press doesn’t melt the vinyl. - Lastly, I simply stuffed the insert inside the pillow cover, zipped it up, and placed my finished pillow in the crib!


Leave a comment