
AS FEATURED ON:
Project Intro
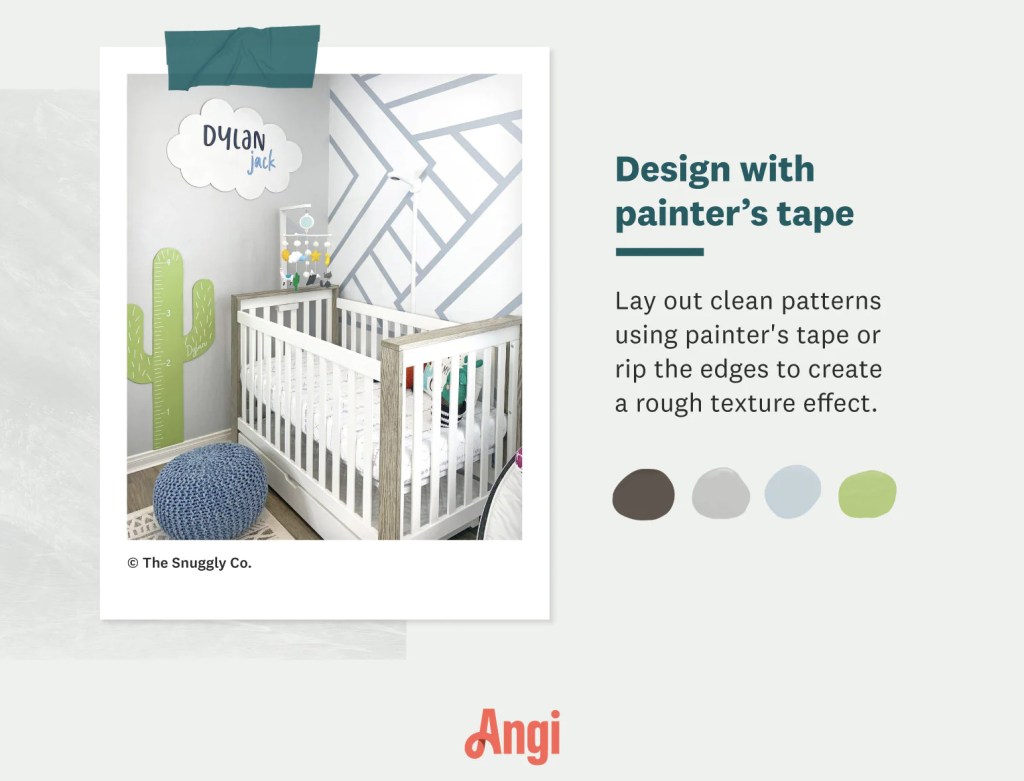
One of the most popular elements of building a mom’s dream nursery is creating a stunning accent wall! There are so many ways to do this, including using decorative wallpaper, wood shiplap, photo frames, among many others. For my son’s nursery, I originally wanted to apply a cute, patterned wallpaper behind the crib. However, that plan was quickly scrapped when it occurred to me that the bubble orange peel texture of my walls would not work for the application of wallpaper. I decided instead that I would paint a custom geometric pattern directly on the wall to accent the room.
Unlike the other methods, painting your wall is beneficial because (1) it’s cheaper than buying expensive wallpaper, (2) it’s easy to paint over when you’re read to remove the design, whereas wallpaper takes a harder process, and (3) you can choose the colors and design that best suit your style!
If you’re looking for color inspiration, the colors I used for this project are as follows:
- Main Room Color: Behr Ultra “White Metal” (Eggshell finish)
- Baseboard Moulding Color: Behr Ultra “Ultra White” (Eggshell finish)
- Accent Wall Base Color: Behr Ultra “Silent White” (Eggshell finish)
- Stripe Color: Behr Ultra “Intercoastal Gray” (Eggshell finish)
Materials
For this project, you will need:
- (1) Quart (or more if your wall is over 100 sq. ft.) of your accent wall base color
- Paint roller and paint tray
- (1) Quart of your accent wall stripe color
- 1.5″ Paint brush
- Frog Tape (Delicate Surface 1.88″ recommended)
- Level
- Long ruler
- Sanding block
- Foam Brush
- Pencil, Scissors
The Process
1. Paint Your Base Color
The first step is to paint your accent wall the base color of your choice. If your is already the color that you want, you can move on to the next step!
In this project, our main wall color for the room was Behr Ultra White Metal in an eggshell finish. To lighten the accent wall up a bit, we used Behr Ultra Silent White (which is still a gray color despite the name).
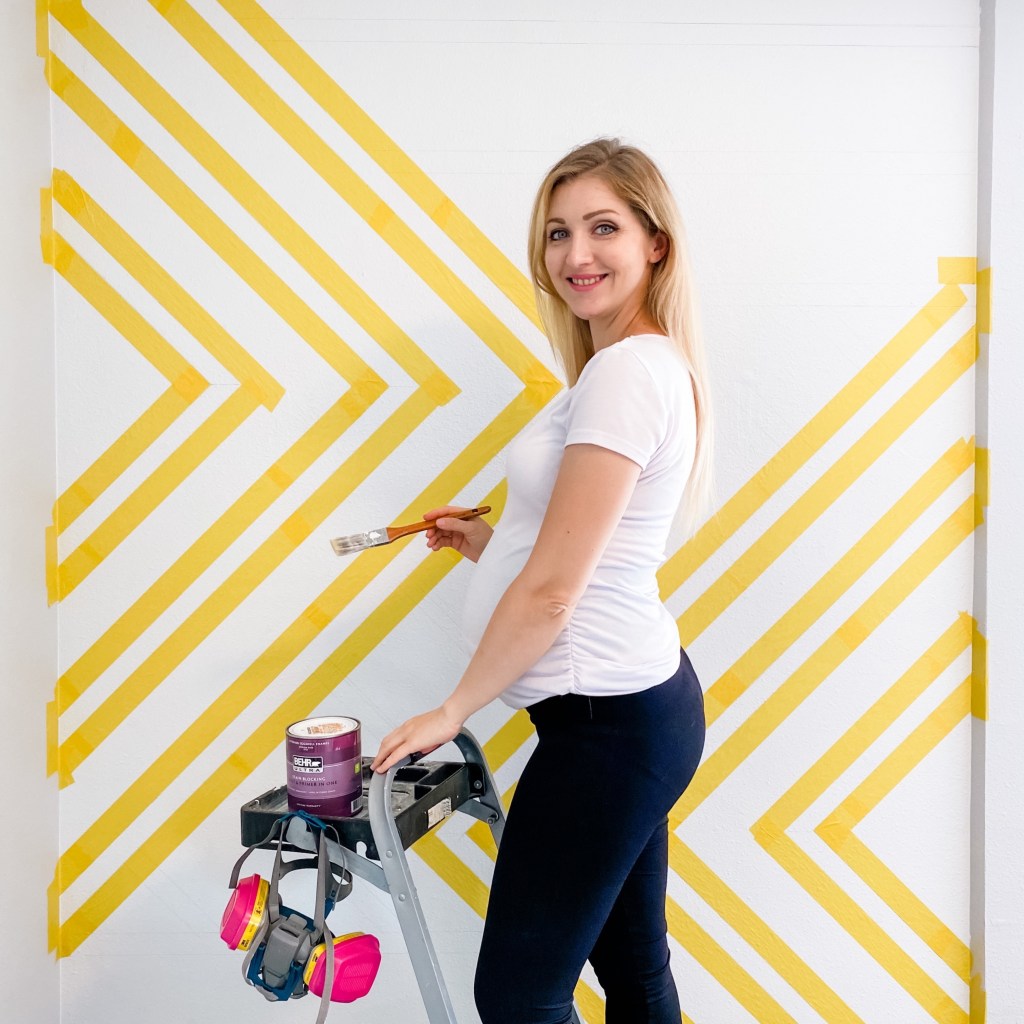
To paint the wall, use some Frog Tape to tape off the areas around your wall to prevent any mistakes. We recommend using the 1.88″ Delicate Surface tape because it’s wider (which makes it easier to avoid mistakes) and will not peel off existing paint. Then paint the wall with a foam roller.


2. Draw Your Design
Unless you’re just creating your design as you go, this will be the most tedious but important part of the whole project. If you have graphic design experience, the best way to create your design is by drawing your wall to scale in a program such as Adobe Illustrator and creating the design to the exact dimensions. This will make it so much easier when you draw the design on your actual wall since you will have all the dimensions and lengths ready to go. You can make sure that all parts of the design are symmetrical, at the correct angles, and parallel before you start.
If you don’t have graphic design experience, you can draw your design out on a sheet of paper with scaled dimensions (1 inch = 1 foot) and a protractor to get your angles.
In this design, I made things easy for myself by using only 45 degree angles and 1.5″ wide stripes. When drawing it on my wall, I used a level to make sure that all my lines were at the correct angle and a long ruler to trace the lines.
Once drawn, you will need to outline your design with Frog Tape, making sure that you place the tape just OUTSIDE of the lines so that they get covered with paint. Otherwise, you will have a lot of erasing/cleaning to do!


3. Prepare for Painting
If you design has intersecting lines, the best way to paint it will be in phases. That way, you can easily apply the Frog Tape to one line at a time without worrying about bleeds and mistakes.
Apply the tape to the first part of your design, making sure the press the tape down FIRMLY around your lines. It’s best to use your finger and push along the grooves of the wall texture. If you don’t apply enough pressure and your tape has a lot of air bubbles or gaps, you will experience more bleeds under the tape.
When you’re ready to paint, make your first coat of paint very thin, which will help adhere the frog tape to the wall while minimizing bleeds. Depending on the color contrast between your wall color and strip color, it may require 2-3 coats. Once you finish your last coat, remove the tape immediately and let the paint dry completely before moving on to the next step.


4. Painting in Phases
To create intersecting lines, apply your next phase of Frog Tape to the second set of lines. In areas where the lines will intersect, gently sand the edge of the lines with a fine grit sanding block to remove any hard edges caused by the Frog Tape. That way, once you paint your second line, it will look like one smooth shape.
Once sanded and taped, paint your next set of lines following the same strategy as in step 3.


5. Okay, Last Phase!
Since my design had lines intersecting in 3 different ways, I had to finish the paint job in three phases. Though it takes a little longer and requires a little more patience, doing it this way kept my lines nice and clean without the need for complicated taping.


6. Clean Up The Bleeds
No matter how hard you try to avoid bleeds, if your walls are textured, they will always happen. Unless you’re a paint pro (which I’m not), they are unavoidable to some extent. Once all your paint is completely dry, use a foam brush and some of your base color paint to clean up the edges of the lines where the bleeds are. If you applied your Frog Tape correctly, most of your lines should be pretty crisp and this step shouldn’t be as annoying as it sounds!


7. Your Finished Wall!
Once your bleeds are all touched up, your wall is done!


Leave a comment